How do I verify a domain?
Domain verification will allow you to send from any email address on a particular domain. For example, once you have verified
mydomain.com, you can send emails using the Postmark platform with any @mydomain.com email address. This feature is especially useful if you send from a large amount of email addresses in a single domain or send email on behalf of your customers.
Verifying your domain also helps you get ready for the 2024 Gmail and Yahoo authentication requirements.
Adding the DKIM and custom Return-Path record to the domain's DNS will not affect any other DNS records already in place, nor affect sending from the domain using a method other than Postmark.
See the helpful video below on how to verify DKIM, custom Return-Path, and DMARC records, or follow the detailed instructions listed below.
🗂 Jump ahead
Verifying DKIM
- Navigate to your Sender Signatures page.
- Under the domain you're verifying DKIM, select DNS Settings or Add a DKIM DNS record.

- A DKIM record will be shown that needs to be added to your DNS as a TXT record.

- Head over to your host or DNS provider and access the area where you can add new DNS records.
- In your DNS provider, add a new TXT record with the Hostname and Value shown in your DNS Settings page for the domain you adding DKIM for.
Once the record is added to your DNS, DKIM will show as verified in your Postmark account within 48 hours. You can use the Verify button to initiate a manual verification check if you do not see the record automatically become verified. After the DKIM record is verified, we will begin signing emails sent through Postmark using this domain with DKIM.

The entire domain is now DKIM verified for sending. Next step, the custom Return-Path!
💡 PRO TIP: You can also use the Domains API or the API Explorer to pull a list of your domains and their authentication status.
Verifying custom Return-Path
The Return-Path (also known as the "envelope-from") is the address where bounces and other email feedback are sent. It's also the value that allows for messages sent by Postmark to pass SPF authentication.
- On the same DNS Settings page where DKIM is verified, the Return-Path values are listed.
- In your DNS provider, add a new CNAME record with the Hostname and Value shown in your DNS Settings.
- By default the hostname is
pm_bounces. - For the CNAME record, add the value of
pm.mtasv.net
- By default the hostname is
Once the record is added to your DNS, Return-Path will show as verified in your Postmark account within 48 hours. You can use the Verify button to initiate a manual verification check if you do not see the record automatically become verified. After the custom Return-Path record is verified, messages sent by Postmark for your domain will start to pass SPF alignment.
Setting up DMARC
DMARC is an email security standard that allows domain owners to monitor who’s sending email using their domain and instructs email receivers (like Gmail) to approve, quarantine, or reject emails that aren’t sent from an authenticated source.
Gmail and Yahoo will start requiring DMARC for all bulk senders who send more than 5,000 messages a day, but even if you aren’t sending at that volume, we encourage you to set up DMARC anyway. Here’s a step-by-step walkthrough of
how you can set up DMARC for your domain. Gmail and Yahoo don't require strict DMARC policies, so you can get started with a “p=none” policy. With that policy in place, you can start monitoring who’s sending email using your domain without receivers taking any action just yet.
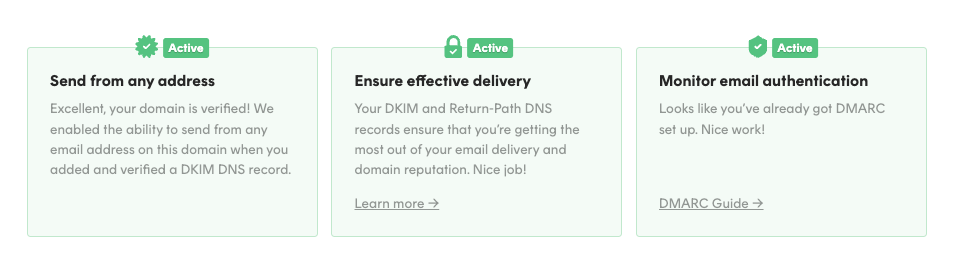
Once you've verifed DKIM, a custom Return-Path, and DMARC you'll see what we call the magic trifecta of email authentication 🔐🔐🔐.
Specific steps for common DNS Providers
Looking for most specific instructions? Below are some links to instructions on adding DNS records for common hosts and DNS providers. If you use a different hosting or DNS provider that you feel should be included here, please contact us.